This chapter contains the following topic:
Identifying Correcting Entries
The Correcting entries selection enables you to view all activity for a specific G/L account within a specified range of dates, and label selected entries as correcting entries.
Correcting entries are explained in the Control Information chapter, under the discussion of the question Allow correcting transactions. You may use the Correcting entries selection even though you have answered N to that question.
The software contains provisions for creating the Expanded Cash Flow Statement. In order to handle the requirements for this statement, correcting entries must be labeled as such.
This selection is similar to View Accounts, but has been separated so that it can be password-protected. You may want to assign a password to this selection so that correcting entries may only be made by authorized personnel.
Select
Correcting entries from the G/L menu.
Graphical Mode

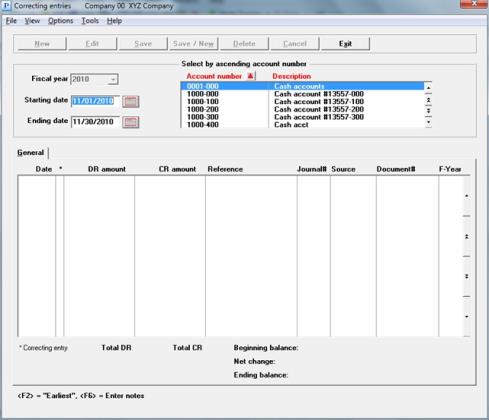
Select the G/L account you want to correct by using the list box.
Correcting Entries (accounts) List Boxes
There are two list boxes on this screen. Use the upper list box for finding the account. When the focus is on a list box the data in the box turns blue.
The upper list box displays up to 6 existing accounts at a time. You may sort the accounts by account number or description both in ascending or descending order. To select a field or change the sort order, click on the column name or the arrow to the right of the column name or use the View options. Only column names in red may be sorted.
To locate an account, start typing a account number or description depending on which sort field is selected. You may also use the up/down arrows, Page up, Page down, Home and End keys to locate a checking account. The <F1> and <SF1> keys function the same as the up/down arrow keys.
The lower list box displays the transactions for the starting and ending date ranged selected. When the focus is on the lower list box you may select <F5> to mark (or unmark) and entry as a correction. When a transaction is marked as a correction, a Y displays in the * column.
Select the Exit button or <Ctrl+x> to return to the menu.
Options Menu
From the Options menu selection, you may enter account notes. See Using notes.
Character Mode
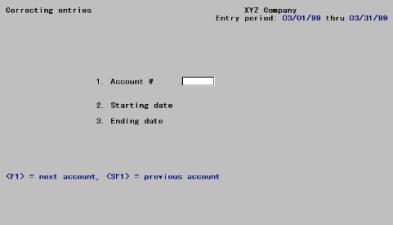
The following screen appears:

In graphical mode the account is located via the list box. See Correcting Entries (accounts) List Boxes
In character mode it is selected via this field:
Options
Enter the G/L account that you want to correct or use these options:
|
<F1> |
For the next account |
|
<SF1> |
For the previous account |
If there are no entries for this account, you are so informed.
|
Format |
Your standard account number format, as defined in Company information |
|
Example |
Enter account 1000-000 |
Ending date
Options
Enter a range of dates to view. These need not correspond with an accounting period. You may use the option:
|
<F2> |
For the Earliest starting date or Latest ending date |
|
Format |
MMDDY at each field. The defaults are the starting and ending dates of the current period. |
|
Example |
Press <F2> at each field |
In graphical mode, the marking and unmarking of an entry as a correction is done when the focus is on the list box.
Character Mode
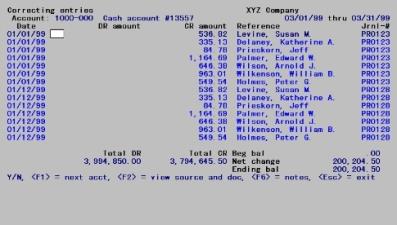
Make any needed changes. Press <Enter> for the next screen:

Up to fourteen entries can be shown on the screen at once. The current entry is highlighted. If there are more entries than this, you can use <Up>, <Down>, <Left>, <Right>, <PgUp>, and <PgDn> to move around.
There is no limit to the number of pages that may be viewed when paging forward. However, you cannot back up more than nine pages.
On the screen containing the last entry on file, the total debits, total credits, beginning balance, net change, and ending balance are shown.
Correcting entry status
The correcting entry status appears in a column to the right of the date field which has an asterisk (*) heading.
In graphical mode, select the entry in the lower list box. Select <F5> to Mark or Unmark the entry as a correction. When a transaction is marked as a correction, a Y displays in the * column.
In character mode, you have the following options:
Options
Enter Y to turn off, N to turn on, or <Enter> to leave unchanged the correcting entry status of this entry. N displays as such upon entry, but is then converted to a blank. You also use one of the options:
|
<F1> |
To select next account |
|
<F2> |
To toggle between viewing the source and document number, or the reference and journal number |
|
<F6> |
To view or enter any notes for this G/L account |
|
<Esc> |
To exit back to the menu screen |
|
Format |
One letter, either Y or N. Lower-case is accepted. |
|
Example |
Press <Enter> |
Press <F6> and in graphical mode you may also select Account notes from the Options menu.
You may enter notes about the account being displayed. Each note is given a date / time stamp so that you can scan through the notes in time sequence later. Notes are an exception to the general rule that View transaction functions allow you to see information without changing it.
Select the New button to add a note. Enter the date and time and up to 10 lines for the note.
Select Save or Save/New to save the note. When finished, select Exit to return to the corrections screen.
In character mode, this selection uses the character text editing functions. For further instructions, refer to the Using Notes section of the Use of Function Keys, Tool Bar and Windows chapter in the System User documentation.
|
Format |
Ten lines of 77 characters each |
|
Example |
Press <Esc> |